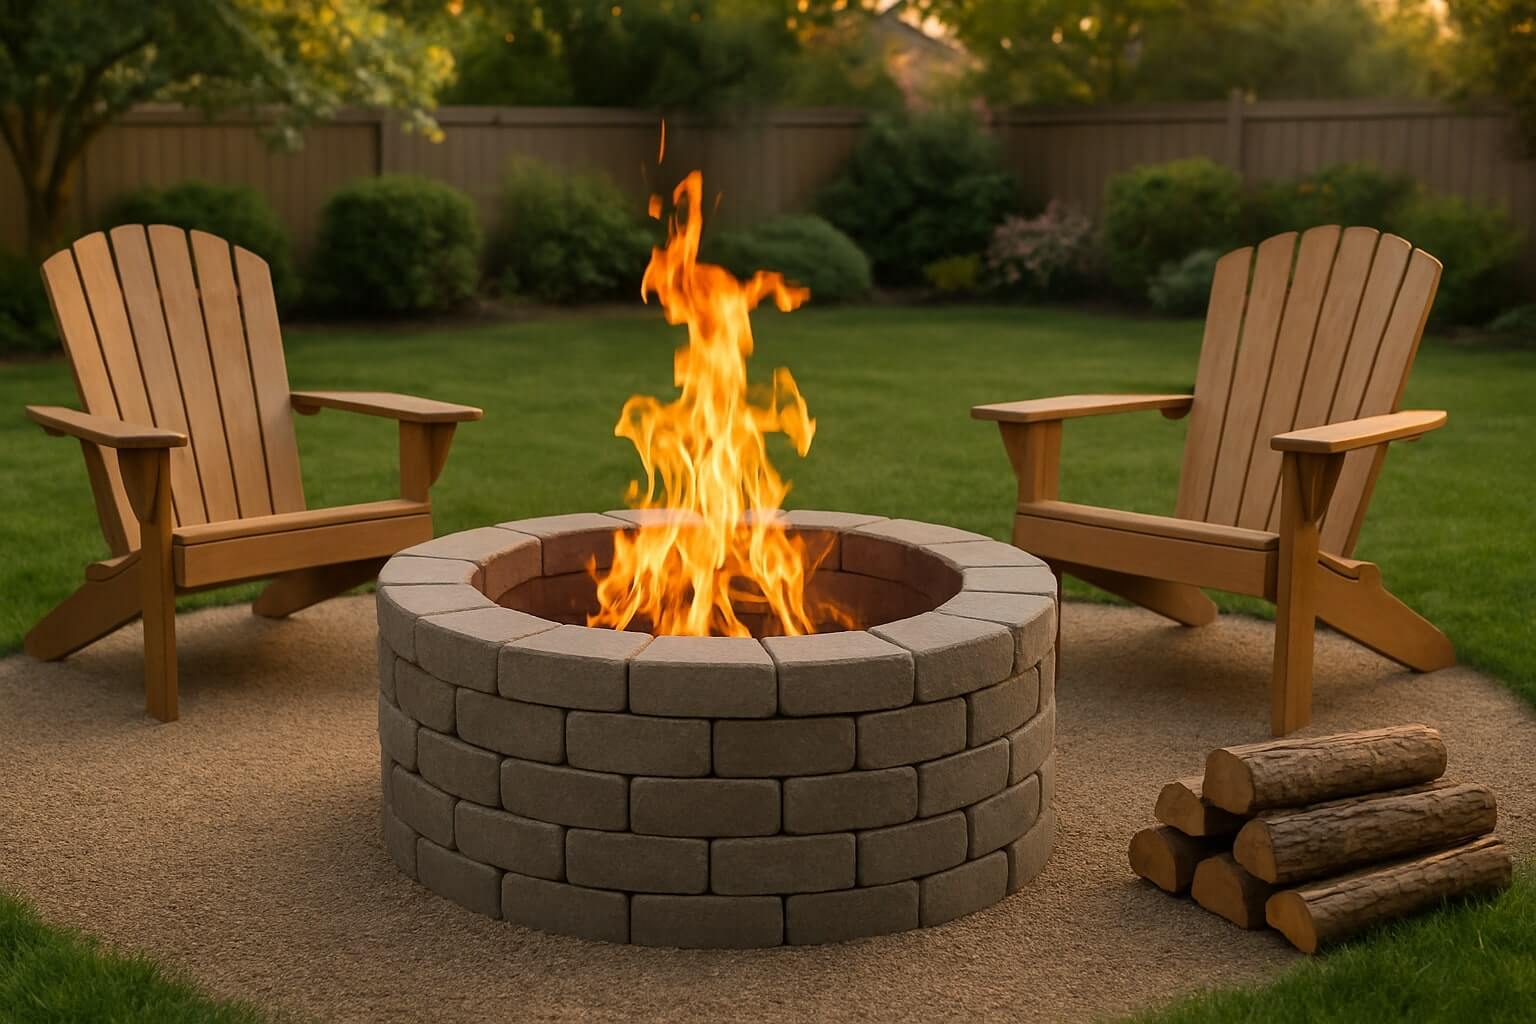
If you’ve ever sat around a regular fire pit, you probably know the struggle. Your eyes stinging from smoke, clothes reeking of it, and everyone constantly shifting around to avoid the smoky side. It’s no wonder so many folks are now searching for how to build a smokeless fire pit instead. Because, let’s be honest, nobody wants the smoke, but everyone wants the warmth, the glow, and the memories that come with a backyard fire.
In this post, I’m going to show you exactly how to build a DIY smokeless fire pit that’s not only easy on your wallet but also eco-friendly and safer for your outdoor areas. Whether you’re a total beginner or you’ve tried building a fire pit before, you’ll find step-by-step instructions that make the process fun and straightforward.
Plus, smokeless fire pits mean more time enjoying your fire and less time dealing with smoke and mess. Ready to learn how to build one for yourself? Let’s get straight into it.
Table of Content
- How Does a Smokeless Fire Pit Work?
- Step-by-Step Instructions to Build Your Smokeless Fire Pit
- How Much Does It Cost to Build a Smokeless Fire Pit?
- Tips for Maintaining Your DIY Smokeless Fire Pit
- Frequently Asked Questions (FAQs)
How Does a Smokeless Fire Pit Work?
Before we get hands-on with the whole building process, it helps to understand what makes a smokeless fire pit different from a regular fire pit. The secret is in how it burns the wood.
A smokeless fire pit design uses something called double combustion or secondary burn. That means it doesn’t just burn the wood once. Instead, it burns the smoke and gases that come off the wood a second time. This extra step burns up most of the smoke, so what you get is a cleaner, hotter fire with way less smoke bothering you or your guests.
Think of it like this: when you light a normal fire pit, you see smoke because a lot of the fuel isn’t burning completely. In a smokeless outdoor fire pit, the air is carefully directed through vents to feed oxygen not only to the central fire but also to the smoke that would usually escape. This makes the fire burn more efficiently and keeps smoke to a minimum.
Here’s a simple diagram to help you visualize the airflow:

Once you get this system set up in your fire pit, you’ll notice a much more pleasant fire that won’t send smoke right in your face, making your backyard fire pit evenings more enjoyable.
Step-by-Step Instructions to Build Your Smokeless Fire Pit
Now that you know how a smokeless fire pit works, it’s time to get started on building yours. I’ll walk you through each step so you don’t miss a single thing.
Step 1: Choose Your Location

First things first, you need to pick the perfect spot for your fire pit. You want a flat, open area at least 10 feet away from any structures, trees, or anything flammable. Think about where you usually gather in your backyard, near your patio or a seating area.
Also, make sure the ground is level and free of debris. If you plan to build an in-ground smokeless fire pit, check if digging is allowed in your area.
Step 2: Gather Tools and Materials

Now, let’s talk about what you’ll need to build your smokeless fire pit. Most of these are easy to find at your local hardware store or even lying around the house if you’ve done any past DIY projects.
Basic tools:
- Shovel
- Level
- Tape measure
- Drill (if installing vents or steel components)
- Safety gloves and goggles
Materials (choose based on your build style):
- Concrete blocks or bricks (or both)
- A stainless steel fire pit insert or burn ring (optional but highly recommended)
- Gravel or sand (for base)
- Steel mesh or grate (optional)
- Fire-resistant adhesive or mortar (for a permanent build)
- Firewood or charcoal for testing
If you’re feeling creative, you can also try other DIY smokeless fire pit ideas, like building one using a 55-gallon drum. The goal is to create a double-combustion fire pit, which we’ll explain shortly.
Once you’ve got all these ready, you’ll be set to move on to preparing your site and starting the build.
Step 3: Prepare the Ground or Dig Your Base
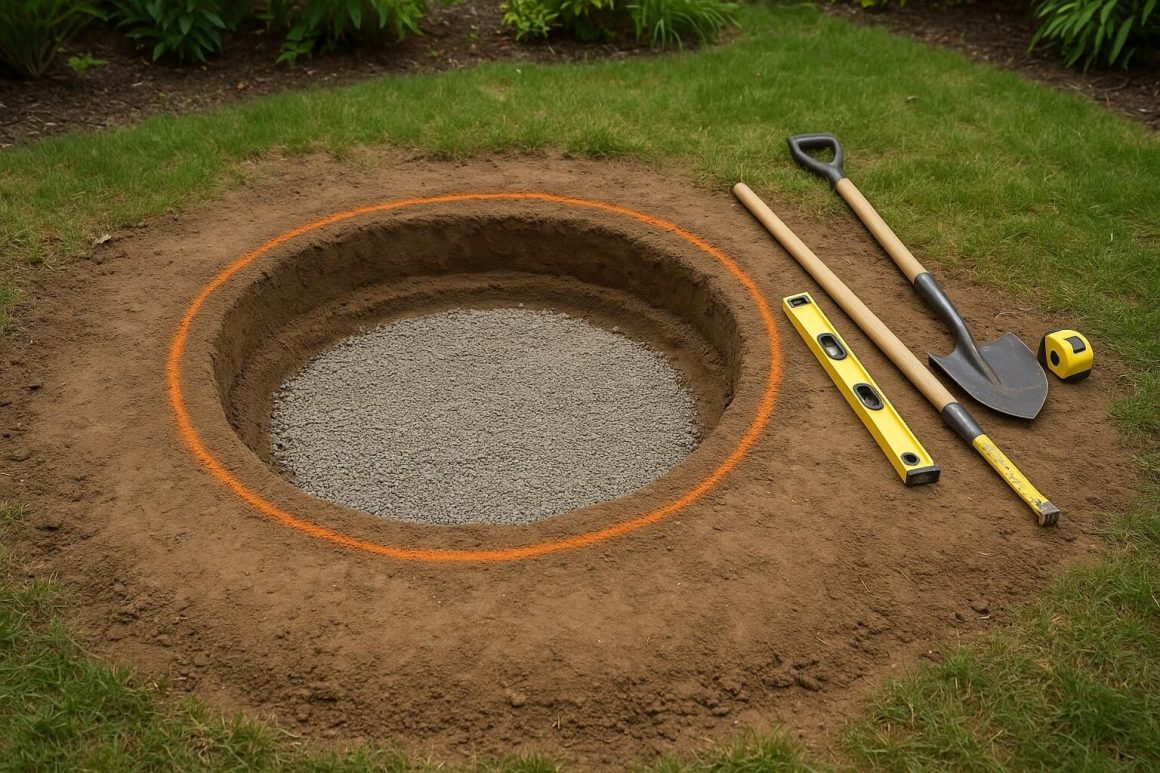
Once your tools and materials are ready, it’s time to prep the area. First, clear your chosen spot of grass, plants, and debris, so you have a clean, flat area with enough space around it for safety. Then, mark out a circle for your fire pit. A standard size is between 36 and 44 inches wide.
Next, if your fire pit will sit on the ground, dig down about 6 to 12 inches to create a solid base. For in-ground smokeless fire pits, dig deeper and make sure the sides are straight. Then, add a few inches of gravel or sand to help with drainage.
After that, use a level to check your base is even. A level base keeps your fire pit steady and helps with airflow, which is key to keeping it smokeless.
If you’re building on concrete, make sure the surface is clean and flat before starting. By prepping your base properly, you’ll end up with a fire pit that’s sturdy, safe and works well.
Step 4: Build Inner and Outer Walls with Airflow Gap
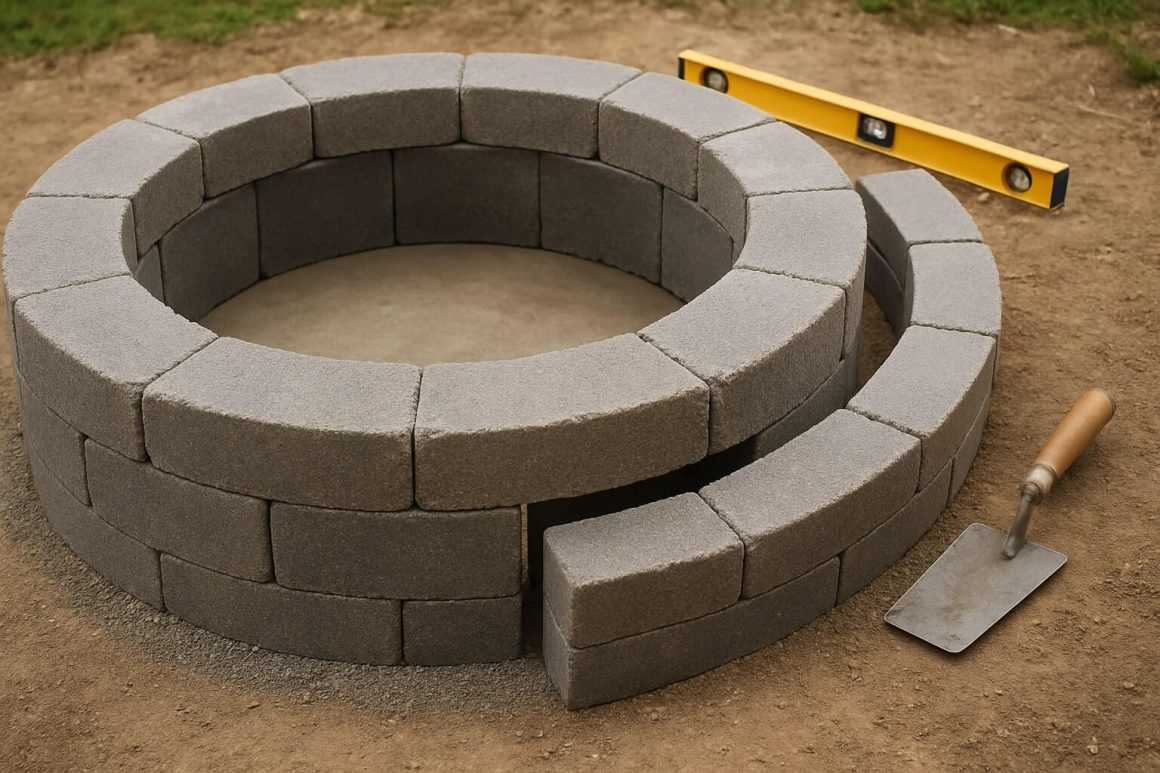
Now it’s time to start building the actual structure of your smokeless fire pit. The key here is creating two walls (an inner wall and an outer wall) with a small gap between them.
Start by stacking your concrete blocks or bricks in a circle or square shape, whatever fits your space and design. The inner wall will be where the fire burns, so make it sturdy and heat-resistant.
Next, build the outer wall around the inner one, leaving about 1 to 2 inches of space between the two walls. This gap is your airflow channel. It lets cool air come in at the bottom, rise between the walls, and feed oxygen to the fire from underneath.
Make sure your walls are level and stable. If you’re using mortar or fire-resistant adhesive, apply it as you go to keep everything secure.
This double-wall design is what makes your fire pit smokeless because it creates a “secondary burn.” The extra air heats up and burns off smoke particles before they escape, giving you a cleaner fire with less smoke bothering you or your neighbors.
Step 5: Add Airflow Vents for Double Combustion
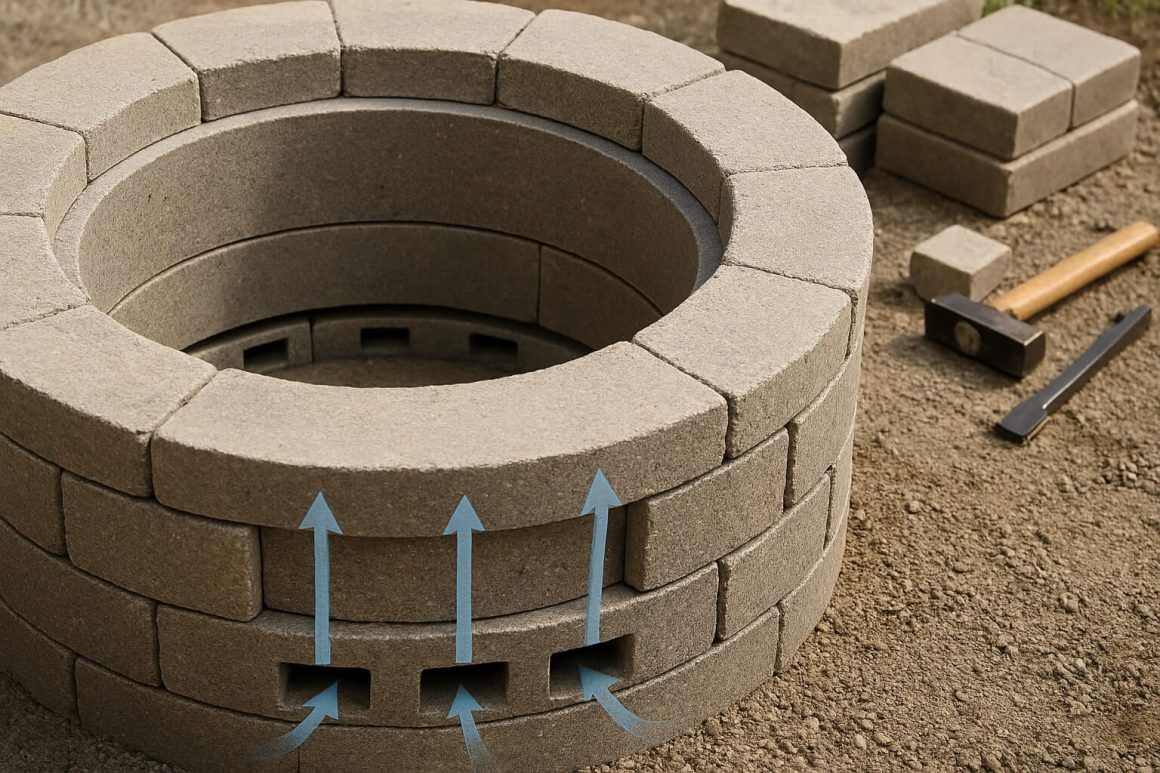
Let’s move on to adding the airflow vents. These vents are super important because they bring fresh air into the gap between the inner and outer walls. This fresh air feeds the fire from underneath and helps burn the smoke before it escapes.
To create these vents, you can leave small gaps or holes near the bottom of your fire pit walls, usually about 2 to 4 inches wide. Make sure the vents are evenly spaced around the fire pit so air can flow freely.
If you’re using bricks or concrete blocks, skip a block or two here and there to make these vents. On the other hand, if you’re working with metal inserts or fire rings, many come with built-in vents already.
These vents are what make the “double combustion” happen. The air comes in through the vents, gets heated in the gap, and then flows into the fire to burn off smoke and gases. As a result, your fire stays cleaner and hotter and produces way less smoke.
Step 6: Install Fire Pit Insert or Burn Ring

Next up, it’s time to install the fire pit insert or burn ring. While this part is optional, it’s highly recommended because it helps protect your fire pit walls from the heat and makes the fire burn more efficiently.
If you have a smokeless fire pit insert or a burn ring, place it right inside the inner wall of your fire pit. This creates a dedicated spot for your firewood or charcoal and keeps the heat focused where it needs to be.
Plus, using an insert can make cleaning easier and can even improve airflow, which helps with that smokeless burn we want.
If you don’t want to buy one, you can create your own using a steel drum or large metal bowl. Just make sure it’s heat-resistant and has plenty of vent holes.
Once the insert or burn ring is in place, double-check that everything is stable and fits snugly. This will keep your fire pit safe and ready to use.
Step 7: Test It Out

Once everything is in place, it’s time to give it a test run. First, gather some dry firewood or charcoal and start a small fire inside your pit.
If your pit is working right, you’ll notice much less smoke compared to a traditional fire pit. The flames should be bright and steady, and you shouldn’t feel smoke blowing into your face.
If you notice smoke lingering, don’t worry! Sometimes, it takes a few fires to fully “break in” your pit. Also, make sure you’re using dry wood and that the vents aren’t blocked. If anything feels loose or unstable, go ahead and make adjustments before your subsequent fire.
And just like that, you’ve learned how to build a DIY smokeless fire pit right in your backyard.
How Much Does It Cost to Build a Smokeless Fire Pit?
You’re probably wondering how much it’ll set you back to build your smokeless fire pit. The good news is it can be surprisingly affordable, especially compared to buying a ready-made one.
The total cost depends on the materials you choose and whether you already have some tools on hand. For example, if you use concrete blocks or bricks you already have, that cuts down expenses a lot.
On average, here’s a rough breakdown:
- Concrete blocks or bricks: $50 to $150
- Stainless steel fire pit insert or burn ring: $60 to $150 (optional but worth it)
- Gravel or sand for the base: $20 to $50
- Tools (if you don’t have them): $50 to $100
- Miscellaneous (mortar, vents, safety gear): $30 to $60
So, overall, building a smokeless fire pit yourself usually costs between $150 and $400.
Plus, if you shop around or reuse materials, you might spend even less. On the other hand, if you want to go big with a large smokeless fire pit or use premium materials like stainless steel, your budget will go up accordingly.
Either way, building your own DIY smokeless fire pit can save you a lot compared to buying a fancy pre-made model, and it’s a fun project to take on!
Tips for Maintaining Your DIY Smokeless Fire Pit
Keeping your backyard smokeless fire pit in top shape means you’ll get better performance and more prolonged use. Here are some essential tips to help you maintain it:
- Clean out ashes after every use. Once the fire is completely out and cool, remove all the ashes. Ash buildup blocks airflow and can make your fire pit less efficient at burning cleanly.
- Keep airflow vents clear. Leaves, dirt, and debris can clog the vents that help air circulate for the double combustion process. Check them regularly and clear any blockages to keep your fire burning smokeless.
- Inspect your bricks or concrete blocks for cracks. Heat and weather can cause cracks over time. Small cracks should be fixed with fire-resistant mortar to prevent structural problems and keep your fire pit safe to use.
- Clean metal parts regularly. If you have a stainless steel insert or burn ring, wipe it down with a damp cloth to remove soot and ash buildup. This prevents corrosion and keeps it working properly.
- Protect your fire pit from the weather. Cover your fire pit with a waterproof cover or tarp when it’s not in use, especially during rain or snow. This prevents rust on metal parts and erosion of bricks or mortar.
- Store firewood properly. Use dry, seasoned wood for your fires. Wet or green wood produces more smoke, which defeats the purpose of your smokeless design and can clog your fire pit vents.
- Check for loose components before each use. Ensure that the bricks, blocks, or inserts are still secure and haven’t shifted. This keeps your fire pit stable and safe while burning.
By following these steps, you’ll help your smokeless fire pit stay efficient, safe, and enjoyable for years to come.
Yes, a smokeless fire pit is designed to burn wood more efficiently by using a double combustion process. This means it burns off most of the smoke before it escapes, giving you a cleaner, more enjoyable fire experience with less smoke blowing in your face.
Absolutely! Using a 55-gallon drum is a popular and budget-friendly way to build a DIY smokeless fire pit. With proper airflow vents and a burn ring or insert, you can create an effective smokeless fire pit that’s easy to maintain and move if needed.
Concrete blocks, fire bricks, and stainless steel inserts are some of the best materials for building a smokeless fire pit. Fire bricks handle heat well, while stainless steel inserts improve airflow and durability. You can also use steel mesh or grates to help with air circulation.
A smokeless fire pit needs enough airflow to keep the fire burning hot and clean. This usually means having vents or gaps near the bottom and sides to let air in. Too little airflow causes smoke, and too much makes the fire burn too fast. So, the right amount of steady airflow is key for a smokeless fire pit to work well.
The best smokeless fire pit depends on your needs. If you want portability, a steel insert or drum design might be best. For a permanent backyard setup, a brick or concrete block fire pit with proper airflow vents works great. Look for one with a double combustion design and easy maintenance.
Building your smokeless fire pit usually takes a few hours to a day, depending on the materials and design you choose. Preparing the ground and letting any mortar dry may add extra time. But once built, it’s well worth the effort for the clean, smoke-free fires you’ll enjoy.
While smokeless fire pits reduce smoke significantly, they still need good dry wood and proper airflow to work well. They can be more complex to build than a regular fire pit, and some designs may cost more due to materials like stainless steel inserts. Also, if airflow vents get clogged, smoke can build up, so regular maintenance is essential.
Conclusion
Building your own homemade smokeless fire pit is easier than you might think, and it’s totally worth the effort. Once you have the right materials and tools and follow the steps carefully, you’ll enjoy a fire that’s cleaner, safer, and more enjoyable for your backyard gatherings.
Remember, the secret lies in good airflow and using materials like bricks or stainless steel inserts to make sure smoke is burned off before it escapes. Plus, a smokeless fire pit is not just better for you, but it’s also better for the environment and your neighbors too.
So, if you’ve been wondering how to build a smokeless fire pit, now you have a clear, step-by-step plan to follow. Grab your tools, pick a good spot, and start creating a cozy, smoke-free space to enjoy with your friends and family.
Want more DIY backyard projects? Subscribe to our newsletter and get step-by-step guides delivered straight to your inbox.
Related Posts: